
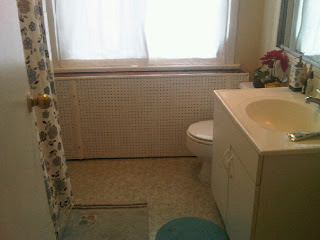
I may have been a little bit niave when I told Ryan that I was going to make a radiator box one day and that I could do it all myself. I am very handy and have done everything from drywalling to painting to installing flooring. So something as simple as a radiator box in my mind should have only taken a few hours. HAHAHAHAH I wish!!! It was a snowy Saturday and Ryan and I set out to Home Depot to find a sheet of lazer cutout metal for the front of the radiator box (so the heat comes out). We were sadly disappointed to find that they don't make them anymore because they bent too easily and were then unsellable. (I would have bought a bent one!!). Off we went to Canadian Tire and Lowes to find the same problem. BUT I would like to announce that although none of the stores had what we were looking ALL of their shelves were made of what we wanted... at Canadian Tire we asked if we could buy their display shelves.... they just laughed at us! Finally we went to the Rona at Royal York and Dundas where we found what we were looking for... however it was $40/sheet and we needed 2 sheets.... This was the first set back. So we changed our design and got a large square sheet of hole filled thick cardboard type wood. (yes that is my technical term for it....) All happy that we had finally found something we went to go put it in the Matrix to find that its too wide. Now we have managed to never have a problem packing the car full of our purchases... sometimes being so crammed in the car there is no room for me! But we have never not been able to fit everything. Ryan looks at me, throws it on the roof and decides we will stick our hands out the window and hold in place while driving. Well it is -10 outside without driving.... needless to say it was a LONG drive home (15 minutes is a long time with your hand out the window). Then we get home to find that the board is wide... but not wide enough. I had even measured the radiator before we left but in all of the frustration of not finding what we were looking for I forgot to measure before bringing the board home! It was NOT going back though... so we made do. This was only problem #1. Next problem... the radiator is so close to the toilet we have just enough room to make the radiator box. Problem #3... our floors are not even so everything is always slightly crooked and takes double the time to do because you have to measure every angle! Ryan and I go outside and cut all of our pieces. We cut the side pieces and the top piece and attached them with glue and nails and put angled pieces in the corner to keep it square. Now for problem #4, since the hole-filled from piece wasn't one large piece and was 3 pieces we had no idea how to attach it to the front and since we didn't have room to do middle posts to attach it too we had to sit back and stare at it for awhile. Finally after much thought we took some left over trim and glued and bolted the front pieces together to make one large front piece. And then glued and nailed (using the nail gun) it to the front. For a finishing touch we used quarter-round along the edges to make it look nice.
What I learned from this project was to measure before you attempt to fit things into the car AND that things that seem simple may just be a real pain in the butt!!!
But after all of the problems we had it looks fantastic and covers up the rusting and peeling radiator in the bathroom!


 Kitchen After: Its hard to see the difference int he picture.. but it shone with cleanliness!!


 Hallway After: A good cleaning and painting does wonders!!


 Closet After: I loved the idea of the Extend-It Closet sytsem that you can get at Canadian Tire. However, the base system is $75 and then you need extra pieces to add onto it. So being the shopping savy person I am I found it for $25 on craigslist and Ryan was very proud of me! So after putting up new drywall and getting it mud and taped by Ryan's brother we were ready to go. We ended up being given a can of green paint and since we didn't really care what colour the room was we painted it green. We also had to put the stick down tiles in here as well because the flooring was puke yellow tiles underneath dirty dirty carpeting!


