
With the fabulous weather we have been having lately I have had a big urge to get out into my garden and start planting. BUT realistically I know it is still too early to plant anything outside as it still gets too cold at night. At this time last year I attempted to get out and garden but the ground was still frozen!!! SO I decided this year I would actually start planting my vegetable garden indoors. I have always planted from seeds outdoors and had no problems, but thought I would try starting them indoors and transplanting they outdoors when the weather gets warmer. So a few weeks ago I grabbed a bunch of random pots I had lying around and planted my seeds for my herbs and tomatoes. I put all of my pots in the kitchen by the window so they were sure to get lots of light. As I was starring at them I was like URGH this looks ugly with 4 different types of pots. But didn't think much about it. When at Dollarama a few days later I found they had Terracotta pots for only $1.25!!!! NICE!! So I bought 4 of them, not entirely sure what to do with them.
When I got home I decided I wanted to spruce them up so they would match my kitchen. My plan is to grow herbs in them year round so in the winter we have fresh herbs too!! I found my good trusty container of Podge It (same thing as Mod Podge) which is slowly running out. As you can see from the picture below its from White Rose... Not sure how many of you remember White Rose! I think it went out of business many many years ago!!! I refuse to buy a new bottle of Podge It until this one it completely done! I also found a package of really nice Italy inspired napkins that my mom had given me as a gift as they match my kitchen perfectly!

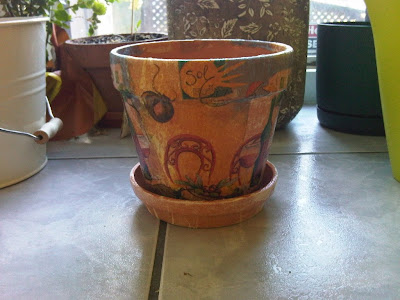
Now I wasn't quite sure how it would work out so it was a bit of a trial and error process. I grabbed a little sponge, my Podge It, one napkin and my pot. The first step was to peel off the top layer of the napkin and cut it to the size of the pot. I ended up needing 3 napkins because the piece I wanted from the napkin was only repeated once on each napkin. So I had to use 3 of them. After peeling off the top layer I coated the pot in mod podge, just a thin layer. Then I carefully lay the napkin on the pot. Placement is key because since the napkin is so thin there isn't much you can do if you stick it in the wrong spot as the napkin will tear! After all 3 pieces of napkin were on the pot I tried to put a layer of Podge It over to seal it all in. THAT didn't go very well... the napkin kept getting stuck to my sponge. SO this is when I had to exercise my patience. I had to wait until the pot was dry. Then after it was dry I could very easily put Podge It over top to seal in the napkin and give it a nice gloss look. I was VERY happy with the results!!!! It looks fantastic in my kitchen! When I have finished the rest of the pots I will post them all on here. But for now here is one!!! You've got to love the wine bottle and glasses!!! Totally fits my kitchen to a T!!! haahaaa!!!

These pots will go perfectly with what I have in mind for our kitchen! But shhhh Ryan isn't too impressed with my ideas.. mainly because it means more work! haaahaa!!! I will reveal that project in the months to come!!! I'm hoping to a mini kitchen makeover sometime this summer when I have a week off!
No comments:
Post a Comment