Thursday, September 30, 2010

Christmas Comes EARLY for the Guerin's!!!

With a little one on the way and baby items starting to slowly take over our house we realized we needed to maximize on storage with all of the furniture in our house!!!

I knew that our old Ikea Lack Coffee Table just wasn't going to cut it. It had treated us well but was flimsy and wouldn't hide any of the baby mess when we had company over! I'm a strong believer in finding a place for everything so its easier to clean up!!
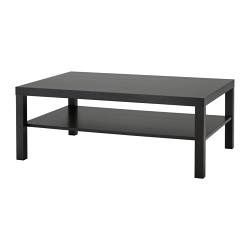
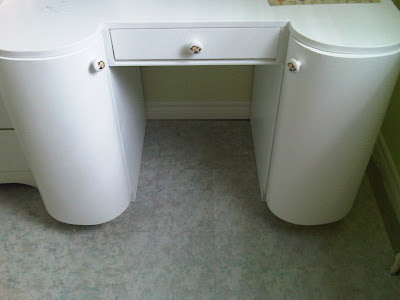
My original idea was to actually use the same coffee table BUT to take off the bottom shelf and buy some baskets to put underneath for storing toys. I was VERY excited about this option until I realized that finding 3 or 4 baskets that would fit just perfectly was basically impossible. I had mentioned my dilemma to my mom and while at work one day she called me from Almira's furniture store in Markham. She asked me if I would like a new gorgeous storage coffee table for my birthday/me and Ryan's Christmas present. I instantly said YES!!!
So when I got home from work on my birthday there it was in all its beauty!!! My parents had stopped by to drop it off in the afternoon! (sorry my camera was acting up.. these aren't the best pictures... just don't do it justice!)

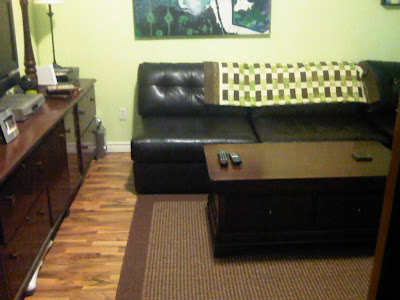
It has 2 large drawers with ample room for kids toys/books etc. Plus it fits in PERFECTLY with our credenza in the living room!


Now we have all the storage we can squeeze into our little tiny house!!! Doesn't it look fabulous! It looks like it was made to go with our credenza!!!
I love it!!! Ryan and I have actually had to change a few of our habits... we tend to eat dinner in the living room and watch TV. With the old coffee table we had no problem throwing plates on the coffee table and scratching it up because it was from Ikea!! But with this beauty we actually have place mats that we bring out for meals to protect the surface of the table!!! And coasters are a MUST now!!! Ryan laughs because I was horrible about using them before.. but now I'm the coaster Nazi!!! haahaa!!!


Tuesday, September 28, 2010

LOVE IT TUESDAY - The Reappliance Store

Over the weekend Ryan and I took a trip up to The Reappliance Store by the airport. My brother and his wife bought a new stove for their house there and we thought meh we have nothing else going on.. lets go take a peak at what they have. PLUS they had a don't pay the taxes sale! So we were like hmmm why not... can't hurt to look. We honestly had NO intentions of buying anything!!!

WELL... I would just like to say that I LOVE THE REAPPLIANCE STORE!!! Its basically a scratch and dent warehouse but it does have undented/scratched appliances as well. Anyway, we walked it and started looking at gas stoves. I'm embarrassed to say that our current gas stove requires pliers to turn it on and off.... probably NOT the safest thing to have when you have a baby on the way!!! You can see our current stove on the right of the very old picture below!


It worked and was nothing special... we even had it repaired about a year ago because we didn't want to have to pay $1000 for a new gas stove. Gas stoves are pricey!!!! Then about 4 months ago while cooking I couldn't turn it off without pliers.... more frustration. Which means we haven't been using it, we use our little toaster oven instead because for 2 people it works great!! But Christmas is coming up and I go baking crazy and wanted an inexpensive stove that I could bake MANY cookies in! Oh did I mention our current stove is missing a rack so you can only cook one thing at a time.... no idea where the other rack went... I believe we had it when we moved into the house... its one of those mysteries, up there with my missing socks that NEVER come out of the dryer.


Anyway, so we walked into The Reappliance Store and instantly were in awe at the number of appliances and the prices! They were RIDICULOUSLY CHEAP!! Some of them had minor scratches, others appeared to be perfect, some are refurbished. We got a little side tracked at first and started looking at a new dryer. To paint the picture of our current dryer... its probably 20+ years old, the dial was lost before we bought the house which means once again you had to use pliers to turn it on. AND the worst part is that you can only turn it on for about 20 minutes because it overheats... yes that is correct... SAFETY HAZARD!!!! Since we plan on cloth diapering it up when the blueberry is born we decided to check out the deals on dryers. Low and behold there was the EXACT dryer that matches our current washing machine except in silver rather than white. BIG DEAL!!!! AND to top it off it was only $420!!!!!! Just to show how amazing of a deal this is... the exact same dryer at sears but in white is being sold for $850 plus tax!!! Can we scream a little bit and get excited!!!!


Ryan and I stopped and starred at the dryer in awe... of course our washer was right next to it for half the price we paid for it... ARGH... so we did have to walk away for a few minutes to contain ourselves and not completely freak out!! BUT we fell in love with the dryer and agreed we would purchase it. Then we got back to the original matter of a new stove. The majority of the stuff in the store is stainless steel which would be great if all of our other appliances were stainless steel... but since we just reno'd our kitchen to be white and all of our other appliances are white we really wanted to stick with a white stove. There was only ONE white gas stove and it was PERFECT! I didn't want anything fancy... I wanted something simple and easy to use that didn't have too many digital buttons etc that can easily break and cost a fortune to fix! Plus I have an issue with having a gas stove that has a lot of electrical options... don't ask me why but I don't think gas and electricity really go together. Enough of my blabbering... we came across this beauty!!


It was everything that I wanted! Easy to use, easy to clean and TWO RACKS!! Plus to top it off it was only $420 as well!!!!! (Ok well they both weren't exactly $420.... I just know we spend $840 total on both so I'm splitting it up evenly because it was pretty darn close to that). Now to compare that price to what this exact stove is selling for at The Brick on CLEARANCE... drum roll. It is being sold on Clearance at the Brick for $598.97 plus tax BUT there is a big disclaimer stating that clearance products have various degrees of damage. Our $420 stove is brand new and there is only a TINY little scratch on one side that you can barely even notice!!! Normally this stove sells for $849! Once again WOOOHOOOO!!!


Ryan and I couldn't have been happier!!! Now we just have to go pick up our purchases... Ryan opted our of the $75 delivery as he can just borrow a friends truck to pick them up. Plus then he can take our old stove and dryer and a metal desk we have in the backyard to the metal scrappers to get some extra cash for them!!! VERY exciting!!!


I can't wait for the new appliances to arrive so I can bake bake bake!!! Ryan is pretty excited for me to bake as well as I haven't done it since Christmas because the old oven was a pain to use!!!

Sunday, September 26, 2010

Crib Skirt and Curtains

Last week Ryan and I made a trip to Fabricland to check out fabrics to make a crib skirt for the nursery. We want to hide what is being stored underneath the crib since there is so much storage room under there. The original plan was to get a white patterned or embossed fabric to not add too much more colour into the room since there is a lot of colours going on... BUT then we came across this lovely fabric at a whopping $5 a metre!!!!! It was just too perfect to turn down! The green matches perfectly and it brings pink into the room (Since we're having a little girl) without overpowering the room in colour!!! Our daughter will 100% know her colours after living in her room for a little while!!! :-)


So I took about an hour to throw together a crib skirt! I cut the pieces the size I needed (allowing for an inch seam on each side). I pulled out my trusty hem tape (to see how to use hem tape for a no-sew option view my blog post on curtains here ) and ironed the seams. Then it was time to figure out how to attach the skirt to the mattress spring. At first I wanted to use Velcro... but alas I had run out of Velcro and was REALLY excited to get this project done. So out came the ribbon!! I have soooo much ribbon its ridiculous so this was a great time to put some of it to good use!! Using a needle and thread, I tacked a piece of ribbon every 8 inches or so on the top of the skirt. I could have used the sewing machine to attach them but I was watching a movie so I didn't mind doing it by hand. I then tied the ribbon to the mattress spring and TAH DA! Instant crib skirt!

Ryan and I both love the final result as it fits in with the room perfectly!! Plus it only cost us $7.50 for the material since we had everything else on hand. AND we still have about half a metre of material left for other projects!! I looked into buying a crib skirt and you can't just get the skirt... it comes with the bumper pads which you aren't supposed to put in a crib anymore... so why do they continue selling them??? Doesn't make sense to me! Anyway, those together are expensive!! I figure I just saved us a good $60-$80!!!


Now onto the curtains for the baby room! I had been planning on making curtains BUT while perusing the Sears website I came across the PERFECT Roman shades for only $19.99!! I knew I had wanted Roman Shades but had never made them before and after finding them for $19.99 I figured it was one thing that I could just buy instead of making. Sometimes it costs less in time to just buy things. Anyway, I decided on these lovely Roman Shades. We still have the PVC plain white blinds behind the shades for extra darkening. Plus these shades aren't darkening shades as we didn't want our little blueberry to only be able to sleep in the dark... she needs to learn to sleep all the time and to distinguish between day and night. So we opted for these.

Ok I MAY have been too excited after I hung them to notice that they need a little ironing!! haahaa!! Here is a close up of the fabric. It works sooo well with the room! We went with white to just tame down the colours we have going everywhere. I love them!!!


That's it for projects for now!! I'm halfway there in my pregnancy.. only 20 weeks to go!!! Lots of time to finish the last 3 projects in the nursery, the rad box, a shelf and our wall decal animals!!!! Mind you the basement bathroom has to be finished in 20 weeks too!! AHHHH!!!!

Tuesday, September 21, 2010

Fall is Here!

Sadly today is the last day of summer. (insert sad crying face here). I really truly don't mind fall... but I can't call it my favourite season because it leads to winter... my most HATED and LOATHED season! Heehee yes there was a little bit of anger there!!! I LOVE the summer when its sunny and hot outside and you can spend the day outside without getting frost bite and having to amputate your fingers and toes! (not that I've had to do that... but that's what winter brings!).


The other thing I hate about the fall is it is the end of pool season! Sadly this weekend (being a crazy weekend) the pool came down! Now our yard will look bare until the first snow... not that I'm wishing for that in ANY WAY!! I will enjoy our sand pit of a yard from now until then.


It will be sad for all of our Hostas around the pool to shrivel back into the ground. Aren't they so pretty!!! The big tall plant in the front of the pictures is a Hollyhock.. it just decided to pop up this year. We have never had it in the past!!! But that's our yard!! We get random flowers growing each year... no complaints here! You have to love how in the next picture sunbeam is shining directly on the boys as they close the pool!!


It took just about all day Sunday to get the pool closed. The problem is that the drain plug only drains so much and then you have to get out there and manually drain the rest of the water. THEN you have to wait until the pool is mostly dry before folding it up and storing it for the winter. BUT its done now which means we have more time to focus on the basement bathroom!

Yes I said it... basement bathroom... I know its been SO long since I mentioned ANY progress on it!! WELL this weekend we finished digging and evening the ground out and lay down the gravel. WAIT let me REPHRASE THAT... since we were crazy busy technically DAVE finished digging and evening out the ground! THANKS DAVE! I will put a post on that hopefully later on this week when I get a chance to take a picture. The goal is to have the basement bathroom completed by Christmas!!! Fingers crossed!!!!

Sunday, September 12, 2010

Lets Go On Safari!!!

This weekend we did a lot around the house... except it was all things that no one will even notice we did. In fact we spent about 6 hours Saturday morning going through drawers and dressers and organizing EVERYTHING. Alas, since it was such a disaster I did not take any before and after pictures. The initial purpose was to clean out the credenza that we have in the living room and make room for baby toys to be eventually stored in there. I successfully cleaned out 2 drawers and the cupboard in the credenza and they now hold the few toys we currently have. It felt great!! While I was busy with that Ryan dealt with fixing all of our wires behind the tv so that they made sense, as well as plugging them all into a power bar that as easily accessible. We wanted to be able to shut the power down to everything in order to cut down on the electricity we use when we aren't around or sleeping.

That was the majority of our day!

Then today it was time to organize the desk in the nursery. I cleaned it all out and made room for baby clothes etc. Then it was time to finally hang the quilt on the wall. This quilt was the inspiration for the nursery. We bought this a year ago at a quilt auction and had planned to give it as a gift but loved it so much we thought we would keep it. The idea for the tree came from this quilt and thus our SAFARI/JUNGLE nursery for the little blueberry.

We used 3 picture hanging hooks and I attached some fabric to the back of the quilt to make spots to hang it. We opted to hang it as high as possible so no grabby hands would pull it down!!!!


Doesn't it look super cute!!! Next I want to make animal wall decals out of different materials and iron them above the change table so the baby can look at them. But first we are going to wait till we find out the sex of the baby which will hopefully be next week!!! Speaking of the change table look at the fabulous new dresser pulls I picked up on Ebay for $3 each!!! Aren't they adorable!!!!!!!!


Thursday, September 2, 2010

The Many Uses of Wallpaper

I know I've been lacking in my blog posts... I just haven't actually finished any of the projects I'm currently working on :-( And haven't had time to think up something to blog about!! Until today!!!!

After wallpapering the small space above my kitchen cabinets I was left with a LARGE amount of leftover wallpaper..... Now I knew I had no intentions of using it on any other walls in the house (mainly because of the bold pattern) but I didn't want to just store it and then never use it and eventually throw it out! I wanted to figure out what to do with it! SO I went on a hunt for projects and I found that you can honestly do anything with wallpaper! These are some of my favourite ideas!!!!


To make some lovely wall art you can get some old plates or platters at a garage sale and paste your wallpaper remnants on them.

(Photo Source: http://puregreendesign.blogspot.com)


You could at some zing to shudders to make a room divider.

(Photo Source: http://puregreendesign.blogspot.com/)


Instead of wallpapering an entire wall you could create a unique piece of art by wallpapering a portion of a wall and then adding a frame to it. With the fun wallpapers they have out there now this would look fantastic in any room!!! Instead of a headboard to your bed you could do something similar to this to create a fun headboard!

(Photo Source: www.apartmenttherapy.com )


Pull out those 1970's TV tables that everyone's parents own (or used to own) and give them an update!! Just spray paint the edges (in my opinion everyone's TV tables always have gold edges and an ugly picture on the top... just my opinion because that's what my parents, grandparents and all my friends parents always had growing up) then wallpaper the top to add some fun colour! I would then use Mod Podge to seal the wallpaper to avoid stains.
This is one of my favourite ideas!!! If you have a little medicine cabinet with a translucent door, adding wallpaper to the back of the cabinet would bring colour into your bathroom (or which ever room). This would look amazing!!!!
(Photo Source:http://shakinstyle.com/how-to)


This is my favourite only because the stairs to our basement have nothing on the backs of them... we had pealed off the gross astro turf carpeting and had actually used a paintable wallpaper originally to cover the backs of the stairs. But we never got around to painting the paintable wallpaper and with all of the mud and dirt that has come out of the basement we have destroyed the job we had done. That's why I plan on using some of the leftover wallpaper to finish the backs of the basement steps when the basement bathroom is 100% finished!! I think it will look fabulous as an entry from the basement into the kitchen!!!
(Photo Source: www.ferm-living.com )