Wednesday, December 28, 2011

WE MOVED!!!

Things have been a little crazy around here lately! We moved a week and a half ago and then were scrambling to get the house unpacked before we had a Christmas party here.  Then with Christmas madness its just been insane! BUT we're in and SO happy about it! We are LOVING the new house!!!!  SO here is a sneak peak at the new house. Don't worry I will have lots of projects coming up in the next month!
This is the front of the house (picture taken before the leaves fell)
This is our back porch on move in day

Moving inside here is the front entrance with a little Norah crawling around
This is the view from the front door to the upstairs
 Here is the new kitchen! LOVE IT!
 View from the kitchen to the dining room


 The living room! This is the reason we got this house.. its HUGE!!!!! SO much room!

 And the bay gorgeous window in the living room!


The dining room
The main floor powder room

Thats the main floor!!  I will try to come back later this week with updated pictures of the bedrooms and the basement.

Thursday, December 1, 2011

PROJECTS!!!

I have been absent lately... I honestly feel like I'm lost in limbo.  We have 16 days till we get the new house and I have been packing and attempting to plan things for Christmas... while packing. And making Christmas gifts, amidst the packing. And trying to pack things up properly so I can get the stuff I need out easily once we move and packing and packing and packing.... Do you see a trend here... argh! I HATE PACKING!!!!  Plus all those boxes of stuff have to go somewhere and they are currently taking over my kitchen and the living room is full of toys because its too small and I'm going insane because everywhere I go in this tiny house there is STUFF!!  Ryan looked at me the other day and said "I hate our current house... I never had a problem with it until we bought the new house... can't we just move already!" That is EXACTLY how I feel!!! SOOOOOO to get away from my hatred of packing I have been dreaming up projects for the new house!!!!

First off the new house does not have a front hall closet. It has a nice front hall but the previous owners used a wardrobe that her dad had made for them. It was GORGEOUS... alas they are taking it with them. So we need a solution for coats/boots etc.  Instantly Ryan and I both got excited because we had seen the perfect solution 2 summers ago made from an old door. Hence this post way back when about storage benches.

We want to make something similar to these below.  I definitely want storage cupboards at the bottom for shoes and I would also like to build a shelf at the top (above the coats) for hats and mittens. 


 This idea doesn't use the doors BUT I like the shelves at the top and the drawers at the bottom so I would like to combine this picture below with the ideas above.

We are very excited for another project!!!!

Plus we have decided to get rid of our bed frame and are going to make ourselves a headboard!!! The colour theme for our new bedroom is blue, brown and cream/white.  The walls are already blue and our duvet is dark brown so we're going to bring in a creamy white with the blue and brown in a headboard.  We want to do something like this but with larger squares. 
image: nicholestakerstyle.blogspot.com

We have those projects to look forward to (and many more) with the new house! Now we just have to wait 16 days... argh!

Friday, November 11, 2011

Priceless Art

Yesterday I decided Norah and I needed to have some fun.  I've been busy packing and she has been doing a lot of playing on her own while I pack boxes. I decided we'd have fun together.  The previous day I had made a trip to Michael's to pick something up and they had a sale on canvases.  I picked up sixteen 8by 10 canvases. The deal was buy one package of 2 canvases and get the second for a penny.  This resulted in getting 4 canvases for $6 total!! NICE!!!  I also picked up some water based non-toxic paint so Norah could join in on the fun. 

SO I taped plastic to the floor and put Norah in a sleeper that I didn't mind getting paint all over it.  I also popped in her soother to prevent her from hopefully eating all of the paint....honestly it worked great! No paint in the mouth!!

 At first she didn't know what to do. So I put her hands in the paint and she went away and smooshed (yes that is a technical terms for what she did) it all around the canvas.


 I had to keep her interested so I changed up the colours and helped her actually get the paint on the canvas instead of all over the plastic on the floor.  But she had a blast! She liked the goopy feeling of the paint between her fingers.
And after about 10 minutes of painting she decided she was finished and I cleaned her and everything up. This is what we were left with. Now they cost a total of $3 but I love them so much I find them priceless. These will be hung proudly in our new house!!

Tuesday, November 1, 2011

Current House Rant

I would like to begin this post by saying I currently hate my house.... Its funny because for the past 3.5 years I have loved my house! It wasn't until Norah came along that both Ryan and I began to detest certain functions of our house.  We didn't even really realize it until we found our new house and realized how much better it was than our non functional house. 

Here is a list of things that do not work for us in this house:
#1 - Office in the spare bedroom off the living room.  I love our french doors to our spare bedroom. BUT when Norah is playing in the living room and Ryan is trying to work in the office it just does not work!!!  I am constantly having to take Norah to the kitchen so Ryan can make phone calls. We both can't wait for the new house where Ryan has a seperate office on the second floor!!

#2 - Norah's bedroom in the middle of the house.  Once she is in bed we have to tiptoe to the bathroom or the kitchen or pretty much everywhere because her room is in the middle of the house off the hallway from the living room to the kitchen and our bedroom.  Now she sleeps through a lot but its still a pain!!!

#3 - Washing Machine is NOT next to our Dryer.  I don't know if I've ever mentioned this but our washing machine and dryer are not together... they are about 3 meters apart because the vent for the dryer is at the far end of the basement.  We ment to fix this but never got around to it.  Its ridiculous!!!

#4 -   The living room is too small - as I write this I am surrounded by toys and no place for me!!!

That is basically everything that is bugging me. BUT as much as I complain about my tiny house as I start attempting to pack things up to move I realize we have SOOOO much stuff crammed in here! ARGH! Moving is NOT going to be fun.. BUT in the end it will all be worth it!!!!

Sunday, October 16, 2011

EXCITING NEWS!!!!

WE SOLD OUR CURRENT HOUSE AND BOUGHT AN AMAZING AWESOME HOUSE in a matter of 4 days!! Its been a busy week!!!!  So here we go I'm going to recap the past month for us.

We found what we thought was THE PERFECT house about a month ago while on our way back from baseball.  It was pouring rain and we randomly decided to pop into an open house. We LOVED the house. So much that we put in an offer.... well apparently 5 others thought the same thing and we didn't get the house. Now we had originally planned on listing our house in the spring. Our reasoning is that now that Norah is crawling we need more space for her. As well Ryan needs his own space for an office... not one that is connected to where Norah plays and we watch tv.

After not getting the first house we kept an eye on the market but weren't actively searching for a house and still weren't planning on selling our house until the spring. BUT then we saw a super awesome house in Mississauga that "WAS THE HOUSE" so we yet again put in an offer... along with 7 others.... yep apparently the houses we like are the same ones everyone else loves... Needless to say we didn't get that house either. It just wasn't meant to be.

At this point we realized there was huge demand for houses and not much supply... well we just happened to have a lovely house and decided to play Russian Roulette and list our WOn Tuesday at around 10am the house was up on the market.  Instantly we had 5 showings for Tuesday and another 7 for Wednesday... but before the end of the day Wednesday we already had an offer. Yep thats right... after only 36 hours on the market we had an offer. Wednesday night they came to present it but not before someone else decided to put in an offer. TWO OFFERS!! WOW! We ended up getting 99.2% of our asking price and couldn't be happier!!! 

Now it was time to find a house.  We had popped by an openhouse a few days before and fell in love with this one house but it was out of our price range. We felt it was overpriced so just waited to see if it would drop in price. After thinking about it for 2 weeks we finally decided to go back and see it again yesterday morning.  We fell more in love with it.  We figured it wouldn't hurt to put in a lower offer and see what happens... worst case they would say no. 

AND of course we were up against another couple who also wanted the house. After an hour and a half of going back and forth with offers Ryan and I were ready to admit defeat... We figured the other couple would outbid us and we wouldn't be able to put anymore in... I put Norah to bed and shed a tear for the house because I was convinced it wouldn't be ours.

WELL... about 15 minutes later we got a call from our realtor and WE GOT IT!!!!  In the end both of our final offers were the same and the only reason we got the house over the other couple was because the couple selling the house loved our realtor!! I still can't believe it came down to that!!!  The couple selling the house actually called us to let us know it was ours because they were so happy for us!!! It was really cute!!!  I am still in shock!! This house is gorgeous!!!!  They have done sooo much work to it and it really shows!!!

So in 2 months we will be moving into our next (and last) house!  Onto the stats of the new house:
  • 4 bedrooms (3 bedrooms and on will be Ryans office)
  • 1.5 bathrooms (one has heated flooring!!!)
  • HUGE living room
  • seperate dining room
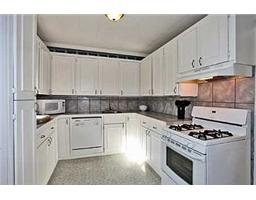
  • Gorgeous kitchen with fabulous appliances open concept into dining room
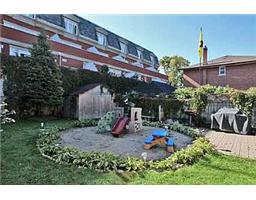
  • HUGE deck with an even bigger backyard
It honestly doesn't need a lot of work... eventually we plan to finish the basement and we also want to build a garage with a mudroom so we would enter through the side entrance but that is down the road. Also when we do that we'd build a master bedroom and ensuite over the garage. BUT for now its in move in condition and we don't need to do ANYTHING for now! 

SO onto some pictures!  I don't want to show pictures of the inside of their house just yet as they have their stuff in it and I don't have their permission to post the photos. BUT I can show you the outside of the house and the yard!!!

This is our new house (sorry its the best I have)
 
 This is the backyard


 Stay tuned for more pictures once we take possession of the house!!!

BUT here are the pictures of our 'staged' (less cluttered) house... I don't have pictures of every room but I have a few.


Anyway wish us luck!!!

Thursday, September 15, 2011

Thanks Mom

On Monday my fabulous mom came over to help fix up our yard.  Now I knew our front yard wasn't beautiful but I didn't know it was that bad until after my mom finished cleaning it up. WOW it looks good now!!! It only took her ALL DAY to fix it up!  It just needed some TLC.  My mom also came up with the idea to put mulch around the tree in our yard to hide the extension cord that is hidden under the ground but pops up right next to the tree for the Christmas lights.  Ryan and I couldn't be happier!!!!

On the left you can see the stones we lay on the yard.  It was to section off that small zone because there is a little bush there that hides the water main.  It just cleans up the yard nicely!


THANKS MOM!!!!!!!!!

Tuesday, September 13, 2011

Why Didn't We Do This Sooner????


I'm going to admit I thought I would NEVER say the phrase "I love my basement".  Our basement was that super creepy basement that no one ever likes to go in, it was dark and dingy. Not to mention cold!!!  Here is a sneak peak at what it looked like when we moved in.  The black thing on the wall was actually a window!! There are 2 windows down there that they had covered up because some idiot drilled speaker wire through the window frame to get sound outside... Needless to say we still need to get new windows BUT we at least uncovered them to let in some light!
We ripped up the astro turf carpet (no joke) when we first moved in and just lay down some area rugs on the concrete floors.

After painting the wood panelling a nice 'eggnog' (by Behr) I painted the zee brick the same colour as I mentioned in this post. I still have one wall yet to finish but I'll hopefully get to that this week. That really helped to lighten up the basement.


Then we got some carpet from my parents place when they replaced their carpet. We didn't install it we just lay it down on the floor as a temporary solution.  Then 2 weeks ago we decided it was time to actually install it! We got everything we needed and started to lay it down only to find a few problems.  First off the 2 pieces of carpet had been weathered from the sun shining through the windows at my parents place and we quickly found they were 2 different colours... one a pinkish brown the other a grayish brown. That I could have lived with.  The second problem was that Ryan and I had serious measuring issues that day and when we cut the carpet we somehow (still have no idea how because we measured 3 times) short cut the piece by 5 inches which meant we had this tiny little strip of carpet down the one wall.  And thirdly... we are NOT carpet installation experts... we did a horrible job (mostly because we didn't have the proper tools).  SO after getting half the carpet installed we stopped and thought about it for a week.  We had planned on returning the laminate we bought for upstairs as we decided not to install it in the kitchen. I measured out the basement and was happy to find we had MORE than enough flooring to install it in the basement.  On Saturday Ryan's mom came and watched Norah as we installed the flooring. It was surprisingly SUPER easy and a lot of fun!!!  Ryan got to use my dads table saw and cut all the pieces while I measured (5 times sometimes just to make sure) the pieces.  AND here is what it looks like now!!!!
You can see where the window is... new windows should be coming before winter which will help brighten it up too!!!!
I need to add some lighting to the back area but this is the sitting area.  There will be a tv above the electric fireplace soon enough.
Look at those nice new baseboards!!!!!
And this section at the bottom of the stairs will be Norah's new play area!

It isn't finished yet. I still have to finish painting the zee brick behind the wood burning stove.  The baseboards need to be caulked, sanded and painted.  I somehow missed a small section of zee brick in the entrance to the laundry room (you can see if above).  I also want to paint the gate in the picture above the same colour as the walls.  Ryan and I LOVE IT!!!! I just can't wait for new windows so it makes the place brighter... and warmer!!!

Friday, September 2, 2011

Wallpaper Steps

I have been busy lately with many projects around the house... I just haven't had a chance to tell you about them yet. SOOO here is one of the many things I have accomplished in the past few weeks.
Remember our back stairway... this is what it looked like before we moved into the house... grey, dirty and disgusting. See the nastiness here.
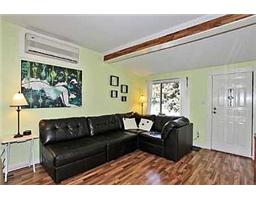
Well we ripped up the carpet before we moved in and painted the walls bright yellow (same as in the kitchen). And it looked GREAT!! As seen here.
WELL after 3.5 years of renovations in the basement and carrying dirt and concrete from the basement bathroom upstairs. And trying to fit furniture in the basement and just everyday wear and tear those yellow walls were NOT yellow anymore!! I also stupidly painted it with a flat paint.... I have no idea why anyone would ever want to buy flat paint... you can't get ANYTHING off the walls!!!! I had asked for a non glossy paint (in my mind meaning 'eggshell') but I got flat paint and didn't really care until I realized I couldn't clean the walls at all!! NOTHING would get the marks off the back wall. SO lesson learned!! I knew I needed to paint it and instead of keeping it the yellow I decided to lighten it up. Now I love the yellow in the kitchen because its bright and cheery but in the back stairwell it seemed dark and not as cheery. I opted to go with the same colour as the basement and the upstairs hallway a lovely 'Eggnog' colour by Behr. AND this time I went with the eggshell finish! On top of that the back of the stairs was never finished because we ripped off old yellow tiles and there was glue residue we couldn't get off. So for 3.5 years we have been humming and haaing about what to do to fix it. Then while browsing my own blog I came across this post I did awhile ago about wallpaper and realized I could wallpaper the back of the stairs. I still had a bunch of the blue wallpaper from our kitchen left over so away I went. I LOVE IT!!! Look at how bright it looks!!! It helps that there is a happy smiling Norah at the top of the stairs! I'll have to take another picture going down the stairs but that will come later.


I promise to update the pictures later. Can you see how crooked our stairs are?? It made for an interesting time measuring for the wallpaper!!

Friday, August 19, 2011

Olioboard


Ok so maybe I'm behind but I just discovered http://www.olioboard.com/ and I LOVE IT!!!! Now I have a Pinterest account but haven't really gotten into it that much... to be completely honest its just too much work for me. Yes its a great spot to collect all of the projects that I would love to do one day BUT Olioboard puts it all into perspective for me!


Basically you can create a mood board out of items you have either found on the Internet OR you can browse Olioboards items that are from different stores. The best part about it is that if you find an item you MUST HAVE on Olioboard you can click on the link and it will take you to the spot where you can buy it!!!!! Now it is a US website so some of the places you can't buy it online but it gives you an idea.


Now that I've gushed about this I'll show you what I created! My best friend Jen just moved into a rather tiny condo. Basically her room was originally supposed to be a den. Needless to say its small. BUT the condo itself is GORGEOUS!!!! I was over there yesterday and helping her get some ideas on how to decorate the tiny space. She has ample closet space between her room, her own bathroom and 2 other closets in the condo. BUT it was a matter of making her room look sexy! After browsing the newest Ikea magazine I came up with this wonderful theme for her room. (Some of these items are from Ikea some of them are similar to items Jen already owns).


Basically its a purple, silver and white romantic theme. The headboard would either be some lacy flowing curtains in white. OR we would find a silvery white material to iron on to the wall as a fabulous headboard. (see my previous iron on projects here) Jen has a gorgeous dresser that is similar to the one above (but white) that adds a nice touch to the room. I just love this chandelier which is actually from Ikea. Now there is no overhead lighting in Jen's room so this probably wouldn't be a functional like, more a decoration and we would bring lighting into the room by a lamp on the bedside table. Then lots and lots of white and silver pillows.


Now this is just idea #1. I already have a million other ideas in mind too!! I had SOOOO much fun on olioboard today... omg I think I'm hooked!!!


Monday, August 8, 2011

Small Things Make A BIG Difference

I have been searching for some type of towel rack solution for the basement bathroom. We had this amazing poster that was given to us by a friend ages ago that I realized would be PERFECT for down there. After we found a reasonable priced place to get it framed it looked fantastic on the wall but it looked odd because we hung it at the top knowing we wanted a towel rack below. I searched everywhere. I had an idea in mind but just couldn't find what I was looking for. They were all either too expensive or not long enough... we had a LONG picture and wall to fill up. Then when perusing the web the other day I found this cute little shelf/towel rack on www.goinghometoroost.com and LOVED IT!!!


So I thought hmmm I could make a shelf like that. While looking downstairs for something completely unrelated I found an old shelf of Ryans that he had originally hanging under the window in the basement. I honestly thought I'd told him to throw it out because we'd never use it... good thing he didn't listen to me!! haahaha!! Only problem was that it was the wrong colouring. Since the bathroom has a cream and black theme going this reddish brown just didn't work for us. BUT we were lucky that it had previously been stained but not sealed... so all I had to do was stain and seal it a nice black!


In 2 days (takes forever for a coat to dry) I had transformed it into this! I opted for inexpensive silver hooks from Home Depot as the places to hang the towels.


After a long process of trying to figure out where the studs were and a few wall plugs later we had this lovely piece hanging in the bathroom beneath the picture we both LOVE!!


Here is a better view of the picture.


Now I just have to get some cute little baskets for the shelf and fill them will soaps and creams!! I'm SO pleased with the result!!!